1. 스프링 액추에이터란?
스프링 액추에이터는 애플리케이션에 대한 모니터링 정보를 엔드포인트를 통해 제공한다.
db, matrix 등의 상태 정보를 제공하며 만약 actuator/health(기본값) 을 통해 접근하면 애플리케이션의 건강 상태를
(up, down.. 등으로) 제공 받을 수 있다. 또한 다양한 설정을 통해 사용자에 맞게 수정 가능하다.
Actuator endpoints let you monitor and interact with your application. Spring Boot includes a number of built-in endpoints and lets you add your own. For example, the health endpoint provides basic application health information
https://docs.spring.io/spring-boot/docs/current/reference/html/actuator.html#actuator.endpoints
2. 스프링 액추에이터 사용하기
우선 스프링 부트에 스프링 액추에이터를 활성화 하려면 스타터 의존성을 빌드에 추가해야 한다.
[gradle]
dependencies {
    implementation 'org.springframework.boot:spring-boot-starter-actuator'
}
[mvn]
<dependencies>
    <dependency>
        <groupId>org.springframework.boot</groupId>
        <artifactId>spring-boot-starter-actuator</artifactId>
    </dependency>
</dependencies>
이처럼 액추에이터 스타터가 프로젝트 빌드의 일부가 되면 애플리케이션에서 여러가지 액추에이터 엔드포인트를 사용할 수 있다.
- 사용가능한 엔드포인트 목록
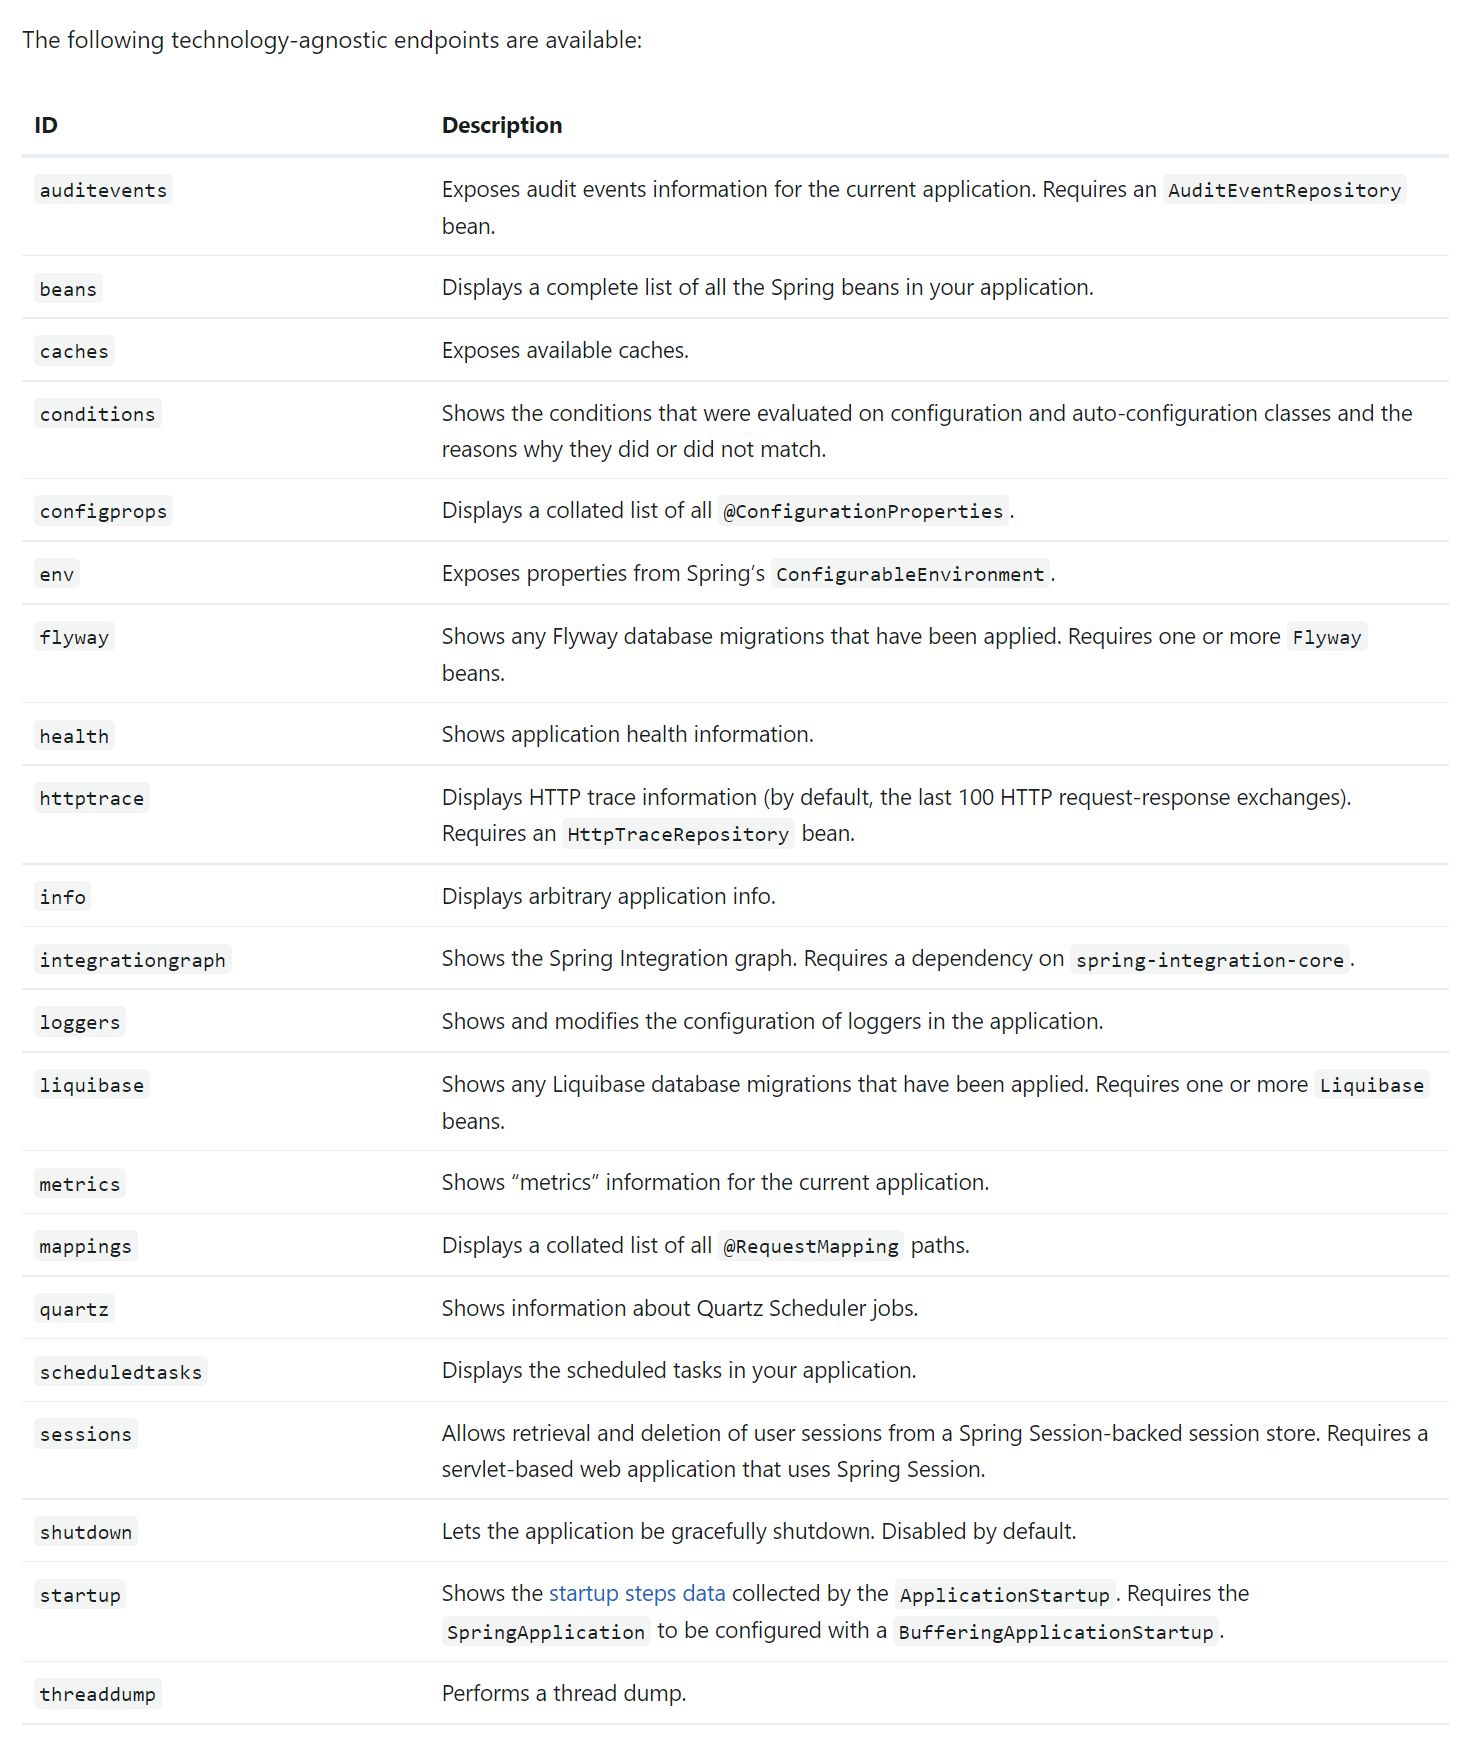
만약 웹 애플리케이션(Spring MVC, Spring WebFlux, Jersey) 을 사용한다면 아래의 엔드포인트들을 추가로 사용할 수 있다.

2.1 설정 하기 (yml)
1) 기본 경로 설정하기
management:
  endpoints:
    web:
      base-path: /management
2) 엔드포인트 경로 설정(변경)하기
management:
  endpoints:
    web:
      path-mapping:
        health : health_check
이렇게 된 경우 엔드포인트의 건강 상태정보를 얻을 때는 /management/health_check 의 GET 요청을 해야한다.
3) 노출항목 설정하기(엔드포인트 활성화 비활성화)
management:
  endpoints:
    web:
      exposure:
        include: health, info
엔드포인트의 노출 여부를 include, exclude 속성으로 설정 할 수 있다.
management.endpoint.web.exposure.include=health 로 설정할 경우 health 만 사용 가능하고
management.endpoint.web.exposure.include = * 와일드 카드를 사용할 경우에는 모든 엔드포인트를 사용가능하다.
/health 와 info 외에 더 많은 다른 엔드포인트를 노출해야 한다면 다른 엔드포인트의 접근을 제한하기 위해 스프링 시큐리티를 구성하는 것이 좋다.
management:
  endpoints:
    web:
      exposure:
        include: "*"
        exclude: "env,beans"
env 와 beans 를 제외한 나머지 엔드포인트를 노출 시킨다.
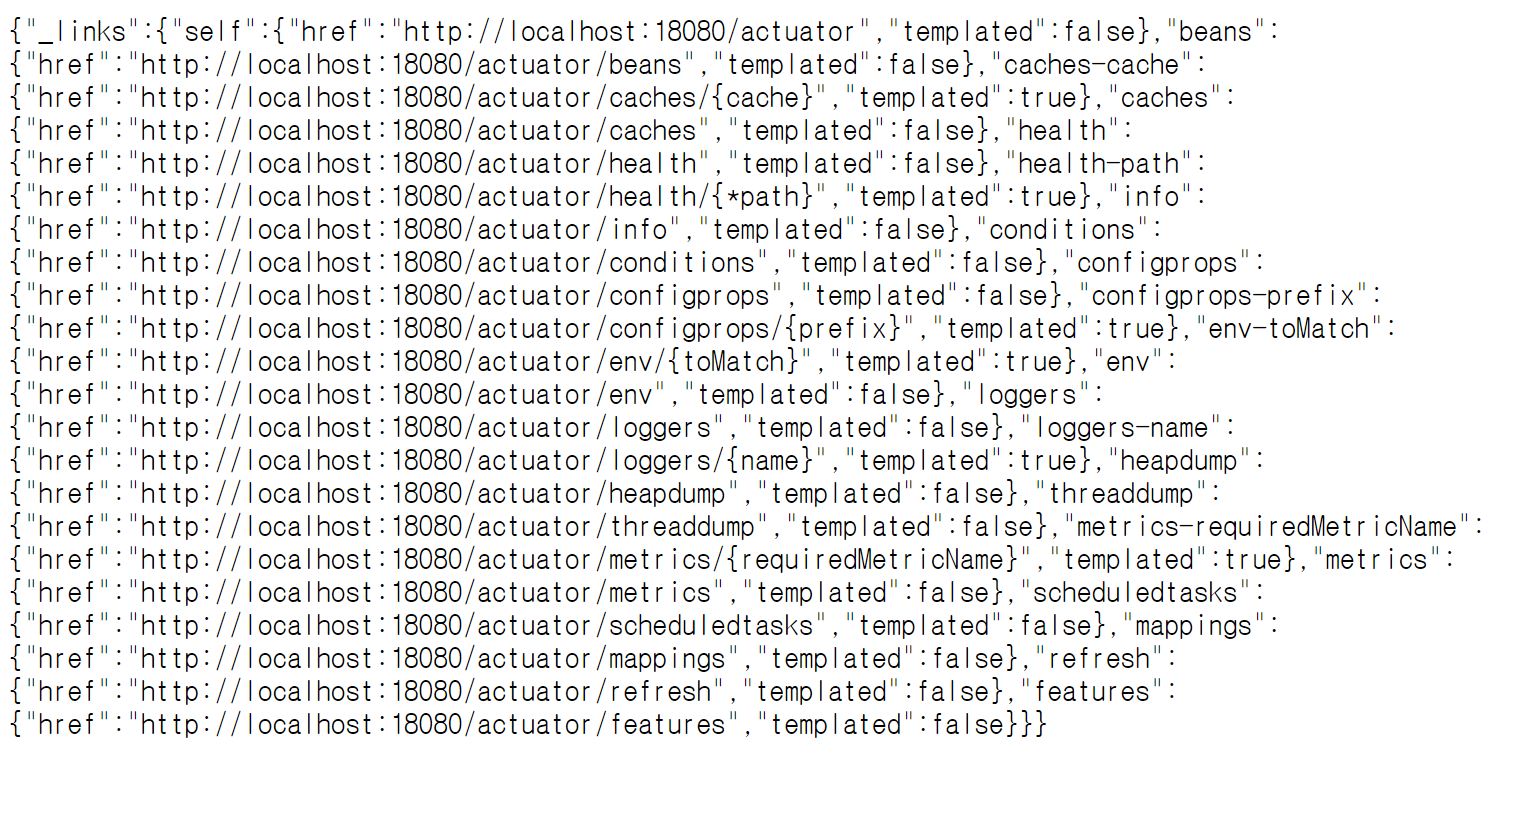
만일 /(base-path) 로 GET 요청을 하면 각 엔드포인트의 HATEOAS링크를 응답으로 받을 수 있다.
4) 디테일 항목 보이기
management:
  endpoint:
    health:
      show-details: always

3 엔드포인트 상세
3.1 health
/health 엔드포인트는 스프링 애플리케이션에 통합할 수 있는 많은 외부 시스템의 건강 상태 정보를 제공한다. 그러나 때로는 스프링 부트에서 지원하지 않거나 건강지표를 제공하지 않는 외부 시스템을 사용하는 경우가 생길 수 있다.
이럴경우에는 HelathIndicator 와 같은 indicator 인터페이스를 구현하여 필요한 기능을 추가 할 수 있다.
스프링 부트에서는 네가지의 상태로 어플리케이션의 상태를 정의 하는데
- UP : 외부 시스템이 작동 중(up) 이고 접근 가능하다.
- DOWN : 외부 시스템이 작동하지 않고나 (down) 접근할 수 없다.
- OUT_OF_SERVICE : 외부 시스템의 상태가 분명하지 않다.
- UNKNOWN : 외부 시스템에 접근할 수 있지만, 현재는 사용할 수 없다.
모든 건강 지표의 건강상태는 다음 규칙에 따라 애플리케이션의 전체 건강상태로 종합된다.
모든 건강 지표가 up 이면 애플리케이션의 건강상태도 up
하나 이상의 건강지표가 down 이면 애플리케이션의 건강상태도 down
하나 이상의 건강지표가 out_of_service 이면 애플리케이션의 건강상태도 out_of_service
unknown 의 건강상태는 무시되며, 애플리케이션의 종합 건강 상태만 반환된다.
3.1 Health 체크 커스텀 하기 - 1
healthIndecator 를 구현하여 Health 를 커스텀 할 수 있다.
@Component
public class MyHealthIndicator implements HealthIndicator {

    @Override
    public Health health() {
        int errorCode = check();
        if (errorCode != 0) {
            return Health.down().withDetail("Error Code", errorCode).build();
        }
        return Health.up().build();
    }

    private int check() {
        // perform some specific health check
        return ...
    }

}
3.1 Health 체크 커스텀 하기 - 2
@Component
public class ApplicationHealthIndicator implements HealthIndicator {
    private final AtomicReference<Health> healthRefer = new AtomicReference<>(Health.down().build());

    @Override
    public Health health() {
        return healthRefer.get();
    }

    public void setHealth(Health health) {
        this.healthRefer.set(health);
    }
}
@Slf4j
@RestController
@RequestMapping(path = "/health")
@RequiredArgsConstructor
public class L7CheckApi {
private final ApplicationHealthIndicator healthIndicator;
@PutMapping(path = "/up")
public void up() {
final Health up = Health.up().build();
healthIndicator.setHealth(up);
}
@PutMapping(path = "/down")
public void down() {
final Health down = Health.down().build();
healthIndicator.setHealth(down);
}
}put /health/up : 상태를 up으로 변경한다.
put /health/down : 상태를 down으로 변경한다.
* health Indicator 이외에도 각 엔드포인트에 해당하는 다양한 Indicator 가 있다.
